Wednesday, December 23, 2020

Azure DevOps Training Course Content

Module 1: Managing Azure Subscription and Resources

1.1 Managing Azure subscriptions
1.2 Assigning administrator permissions
1.3 Configuring Azure subscriptions
1.4 Utilizing and consuming Azure resources
1.5 Analyzing alerts and metrics
1.6 Configuring diagnostic settings
1.7 Monitoring unused resources
1.8 Utilizing Log Search query functions
1.9 Viewing alerts in Log Analytics
1.10 Managing resource groups
1.11 Configuring resource locks and policies
1.12 Moving resources across resource groups
1.13 Managed role-based access control (RBAC)

Module 2: Implementing and Managing Storage

2.1 Creating and configuring storage accounts
2.2 Installing Azure Storage Explorer
2.3 Monitoring activity using Log Analytics
2.4 Deploying Azure storage replication
2.5 Exporting from and importing into Azure job
2.6 Azure Data Box
2.7 Configuring blob storage
2.8 Azure Content Delivery Network (CDN)
2.9 Creating Azure file share and file sync
2.10 Implementing Azure backup
2.11 Creating Recovery Services Vault
2.12 Configuring backup policy

Module 3: Deploying and Managing Virtual Machines Preview

3.1 Configuring VM for Windows and Linux
3.2 Configuring monitoring
3.3 Networking, storage, deploying and configuring scale sets
3.4 Modifying Azure Resource Manager (ARM)
3.5 Configuring VHD template
3.6 Deploying Windows and Linux VMs
3.7 Managing Azure VM
3.8 Automate configuration management with PowerShell Desired State Configuration (DSC)
3.9 Managing VM sizes
3.10 Moving VMs from one resource to another
3.11 Managing VM backups
3.12 Configuring VM backup
3.13 Performing VM restore
3.14 Azure Site Recovery

Module 4: Configuring and Managing Virtual Networks

4.1 Creating connectivity between virtual networks
4.2 Creating and configuring VNET peering
4.3 Virtual network connectivity
4.4 Creating virtual network gateway
4.5 Implement and manage virtual networking
4.6 Configuring private and public IP addresses
4.7 Network routes and network interface
4.8 Configuring name resolution
4.9 Configuring Azure DNS
4.10 Configuring private and public DNS zones
4.11 Configuring Network Security Group (NSG)
4.12 Creating security rules; associating NSG to a subnet or network interface
4.13 Implement Azure load balancer
4.14 Monitor and troubleshoot virtual networking
4.15 Integrate on premises network with Azure virtual network

Module 5: Managing IdentitiesPreview

5.1 Managing Azure Active Directory (AD)
5.2 Managing Azure AD objects
5.3 Creating users and groups
5.4 Implementing and managing hybrid identities
5.5 Installing and configuring Azure AD Connect and managing Azure AD Connect
5.6 Perform bulk user updates manage guest accounts
5.7 Include password hash and pass-through synchronization
5.8 Active Directory Domain Services (AD DS)
5.9 Implement multi-factor authentication (MFA)

Module 6: Infrastructure Setup

6.1 Installation of Devops Tools on cloud
Git
Docker
Selenium
Maven
Jenkins
Puppet
Ansible
Kube

Module 7: Introduction to DevOpsPreview

7.1 What is Software Development
7.2 Software Development Life Cycle
7.3 Traditional Models for SDLC
7.4 Why Devops?
7.5 What is Devops?
7.6 Devops Lifecycle
7.7 Devops Tools

Module 8: Software Version Control

8.1 What is Version Control
8.2 Types of Version Control System
8.3 Introduction to SVN
8.4 Introduction to Git
8.5 Git Lifecycle
8.6 Common Git Commands
8.7 Working with Branches in Git
8.8 Merging Branches
8.9 Resolving Merge Conflicts
8.10 Git Workflow

Module 9: Containerization with DockerPreview

9.1 Introduction to Docker
9.2 Understanding Docker Lifecycle
9.3 Components of Docker Ecosystem
9.4 Common Docker Operations
9.5 Creating a DockerHub Account
9.6 Committing changes in a Container
9.7 Pushing a Container Image to DockerHub
9.8 Creating Custom Docker Images using Dockerfile
9.9 What are Docker Volumes
9.10 Deploying a Multi-Tier Application using Docker Network
9.11 Using Docker Compose to deploy containers
9.12 What is Container Orchestration
9.13 Container Orchestration Tools
9.14 Introduction to Docker Swarm
9.15 Deploying a 2-Node Cluster using Docker Swarm

Module 10: Configuration Management with Puppet

10.1 Need of Configuration Management
10.2 Configuration Management Tools
10.3 What is Puppet
10.4 Puppet Architecture
10.5 Setting up Master Slave using Puppet
10.6 Puppet Manifests
10.7 Puppet Modules
10.8 Applying configuration using Puppet
10.9 Puppet File Server

Hands-on Exercise –
Setting up Master Slave on AWS
Testing Connection of nodes with Puppet
Creating a Manifest
Deploying Manifest on Node
Creating a Module
Deploying sample software on nodes using Puppet Modules and Manifests
Implementing a File Server Module on Puppet

Module 11: Configuration Management with AnsiblePreview

11.1 What is Ansible?
11.2 Ansible vs Puppet
11.3 Ansible Architecture
11.4 Setting up Master Slave using Ansible
11.5 Ansible Playbook
11.6 Ansible Roles
11.7 Applying configuration using Ansible

Hands-on Exercise –
Installing Ansible on AWS
Creating a Playbook using YAML
Creating an Ansible Role
Using Roles in Playbook

Module 12: Continuous Testing

12.1 What is Continuous Testing?
12.2 What is Maven?
12.3 Running Test Cases on Chromium Web Driver
12.4 What is Headless Mode?

Hands-on Exercise –
Using Maven to import dependencies in Eclipse
Implementing a headless test using Chrome WebDriver

Module 13: Continuous Integration using JenkinsPreview

13.1 Introduction to Continuous Integration
13.2 Jenkins Master Slave Architecture
13.3 Understanding CI/CD Pipelines
13.4 Creating an end to end automated CI/CD Pipeline

Module 14: Continuous Orchestration using Kubernetes

14.1 Introduction to Kubernetes
14.2 Docker Swarm vs Kubernetes
14.3 Kubernetes Architecture
14.4 Deploying Kubernetes using Kubeadms
14.5 Alternate ways of deploying Kubernetes
14.6 YAML Files
14.7 Creating a Deployment in Kubernetes using YAML
14.8 Services in Kubernetes
14.9 Ingress in Kubernetes

Case Study –
Kubernetes Architecture

Module 15: Continuous Monitoring using NagiosPreview

15.1 What is Continuous Monitoring
15.2 Introduction to Nagios
15.3 Nagios Architecture
15.4 Monitoring Services in Nagios
15.5 What are NRPE Plugins
15.6 Monitoring System Info using NRPE plugins

Module 16: Azure with DevOps

16.1 Overview of Azure on Devops
16.2 Introduction to Azure Boards
16.3 Understanding Azure Repos
16.4 Use Azure Pipelines
16.5 Implement a code workflow in your build pipeline by using Git and GitHub
16.6 Run quality tests in your build pipeline by using Azure Pipelines
16.7 Manage build dependencies with Azure Artifacts
16.8 Host your own build agent in Azure Pipelines
16.9 Automate Docker and multi-container Kubernetes deployments with Azure Pipelines
16.10 Extend pipelines to add support for different deployment targets, such as Azure Functions

Module 17: Deploying Infrastructure with TerraformPreview

17.1 Installing Terraform – Windows Users
17.2 Installing Terraform – Linux Users
17.3 Choosing Right IDE for Terraform IAC development
17.4 Creating first EC2 instance with Terraform
17.5 Terraform Code – First EC2 Instance
17.6 Understanding Resources & Providers
17.7 Destroying Infrastructure with Terraform
17.8 Destroying Specific Resource
17.9 Understanding Terraform State files
17.10 Understanding Desired & Current States
17.11 Challenges with the current state on computed values
17.12 Terraform Commands – State Files
17.13 Terraform Provider Versioning
17.14 Types of Terraform Providers
17.15 Understanding Attributes and Output Values in Terraform
17.16 Attribute Resource (Document)
17.17 Referencing Cross-Account Resource Attributes
17.18 Terraform Variables
17.19 Data Types for Variables
17.20 Fetching Data from Maps and List in Variable
17.21 Terraform Format
17.22 Validating Terraform Configuration Files

Hands-on Exercise –
Implementing remote-exec provisioners
Implementing local-exec provisioners
Integrating Ansible with Terraform


Module 18: Terraform Modules & Workspaces


18.1 What is Infrastructure as a code
18.2 Iac vs Configuration Management
18.3 Introduction to Terraform
18.4 Installing Terraform on AWS
18.5 Basic Operations in terraform
init
plan
apply
destroy

18.6 Terraform Code Basics
18.7 Deploying and end-to-end architecture on AWS using Terraform

Hands- on Exercise –
Installing Terraform
Initializing AWS Terraform Provider
Creating an EC2 instance using Terraform
Updating changes to EC2 using Terraform
Destroying EC2 using Terraform
Deploying EC2 inside a custom VPC using Terraform


Thursday, December 10, 2020

Projects Portfolios

 S..k..y..p..e - jitendra.tech
                    +919617741414


Sunday, December 6, 2020

CRUD Operation In ASP. Net Core Web API with Entity Framework Core

This article will explain how to perform CRUD (Create, Read, Update, Delete) operations in Asp.Net Core Web API using Entity Framework Core. We will see step by step instructions about CRUD operations in Asp.Net Core Web API. In this demonstration, we will use the Database First Approach where our database will be ready before creating an actual code.

Create the Database and Tables
Create Asp.Net Core Web API Project
Install Nuget Packages for Entity Framework
Generates Model Classes
Setup Dependency Injection
Create Repository and implement CRUD operations
Create a Controller and Create API call
Test the API End Points in Postman
Enable CORS


Steps - 1 Create Database 
   
tables 

Step - 2 Project - asp.net core 

  setup connection string and install some dll from nuget package 
   
Microsoft.EntityFrameworkCore.Tools
Microsoft.EntityFrameworkCore.SqlServer.Design
Microsoft.EntityFrameworkCore.SqlServer

after adding this 


Sunday, November 29, 2020

.net core history

 .NET Core 1.0, announced on November 12, 2014,[5] was released on June 27, 2016,[6] along with Microsoft Visual Studio 2015 Update 3, which enables .NET Core development.[7] .NET Core 1.0.4 and .NET Core 1.1.1 were released along with .NET Core Tools 1.0 and Visual Studio 2017 on March 7, 2017.[8]

.NET Core 2.0 was released on August 14, 2017, along with Visual Studio 2017 15.3, ASP.NET Core 2.0, and Entity Framework Core 2.0.[9] .NET Core 2.1 was released on May 30, 2018.[10] NET Core 2.2 was released on December 4, 2018.[11]

.NET Core 3 was announced on May 7, 2019, at Microsoft Build. Version 3.0.0 was released on September 23, 2019.[12] With .NET Core 3, the framework supports development of desktop application softwareartificial intelligence/machine learning and IoT apps.[13][failed verification]

The next release after .NET Core 3.1 is .NET 5. The .NET Framework will not receive any further major versions, and .NET 5 will be the only .NET meant for new applications going forward – hence the removal of the "Core" branding and skipping of version 4 to avoid confusion with the .NET Framework 4.x.[14] The first preview of .NET 5 was released on March 16, 2020.[15]


Vue js history

Vue.js (commonly referred to as Vue; pronounced /vjuː/, like "view"[4]) is an open-source model–view–ViewModel front end JavaScript framework for building user interfaces and single-page applications. It was created by Evan You and is maintained by him and the rest of the active core team members.

Monday, November 23, 2020

Using SQL to convert row values to a single concatenated string

 A while ago I wrote an article about various ways to concatenate all the values in a set of rows into a single string value. Most solutions to this problem use some sort of looping or recursive method, but a recent forum posting alerted me to a relatively easy way to achieve this using a select statement.


To demonstrate this I’ll create a table and populate it :

CREATE TABLE Colours (ID INT, Description VARCHAR(10))
INSERT INTO Colours VALUES (1,'Red')
INSERT INTO Colours VALUES (2,'Orange')
INSERT INTO Colours VALUES (3,'Yellow')
INSERT INTO Colours VALUES (4,'Green')
INSERT INTO Colours VALUES (5,'Blue')

Then run the following code :
DECLARE @ColourList VARCHAR(100)
SELECT @ColourList=''

SELECT @ColourList=@ColourList + Description + ', '
FROM Colours ORDER BY ID
 
SELECT @ColourList

You can see that the @ColourList variable contains the desired concatenated value :
Red, Orange, Yellow, Green, Blue,

Sunday, September 6, 2020

Q1: What is .NET Core?


.NET Core is a newer version of .NET, which is cross-platform, supporting Windows, MacOS and Linux, and can be used in device, cloud, and embedded/IoT scenarios.

The following characteristics best define .NET Core:
Flexible deployment: Can be included in your app or installed side-by-side user or machine-wide.
Cross-platform: Runs on Windows, MacOS and Linux; can be ported to other OSes. The supported Operating Systems (OS), CPUs and application scenarios will grow over time, provided by Microsoft, other companies, and individuals.
Command-line tools: All product scenarios can be exercised at the command-line.
Compatible: .NET Core is compatible with .NET Framework, Xamarin and Mono, via the .NET Standard Library.


Monday, August 24, 2020

GraphQL

 GraphQL is an open-source data query and manipulation language for APIs, and a runtime for fulfilling queries with existing data. GraphQL was developed internally by Facebook in 2012 before being publicly released in 2015.

Monday, August 17, 2020

.net cover letter

 I am Senior Software Engineer, having 9+ years top experience in .NET Web, SaaS, Database, Migration, API, Library, Services, Reports, Dashboards. I can analyze, design, develop and manage small to large scale applications. I can easily convert your desktop apps to web apps or mobile apps, old language apps to latest .NET apps.

• 5+ Years experience in Kentico CMS.

• 5+ Years experience in Umbraco CMS.

• 5+ Years experience in Sitefinity.

• 3+ Years experience in WPF .NET Applications

• 1+ Years experience in .NET.Core Applications

• 3+ Years experience in Unity 3D C# .NET Applications

• 8+ Years experience in C# .NET Applications

• 7+ Years experience in SQL Server, AWS, Azure, API Dev

• 7+ Years experience as Database Optimization, Reports, Dashboards Expert

• 6+ Years experience in Converting Old Version Apps to Latest, Different Technologies

• 3+ Years experience in Angular, NodeJS, MongoDB, ASP.Net MVC Zero & Boilerplate

• 3+ Years experience in VSTO Add-in for Microsoft Office Outlook,

• 3+ Years experience in SharePoint, MS Dynamics CRM 365 , Microsoft Office Outlook,

My Top Skills Highlights,

40.

1. C#, .NET Core, ASP.Net, ASP.Net MVC, ASP.Net MVC Core, ASP.Net MVC Zero, Boilerplate, CSS, CSS3, HTML, HTML5, Twitter Bootstrap, WebAPI 2.0, Owin, APIs, Json,

2. Angular, AngularJS, ReactJs, Node.js, JavaScript, JQuery, TypeScript, NativeScript, KnockoutJS, , ContentBuilderJS, VideoJS, Bower, Grunt, Gulp, D3JS

3. SQL Server, Oracle, MongoDB, SQL Azure, Azure Functions, Azure API, B2C Integration, AWS, Payment Gateways, Worker Roles, SQL, TSQL, MDX, SQL Cube, Stored Procedures, Entity Framework, UWP, DocX, ZenDesk, Xero, eWay, Stripe, Recurring Payments, MyOB

4. SSRS, Telerik Reports, Crystal Reports, Infragistics Reports, Domo, Dundas Charts..

5. Design of software and databases using Solid Principles, SOA, TDD, Db First, Code First

6. Agile Development Model, Scrum, Prototype Development Modelling

7. Basecamp, Jira, Visual Studio Team Services, SVN, TFS, GitHub, BitBucket, Trello, Jira.

.NET Developer required and also need to discuss requirmeents

We need to discuss - skype - jitendra.tech please add me than discuss requirements

Thursday, August 13, 2020

Kasmo Job Opportunity _ JD for .net fullstack -React js with EVRY INDIA _ Bangalore

 HI

It was nice talking with you. As per our conversation through phone, Please find the JD as well as the details which we discussed through the call is True, Please reply back your acceptance 

Kindly go through the JD & revert me back for the confirmation.


This is opening for EVRY INDIA  Bangalore location.


Job Requirement:
.net fullstack -React js
Experience: 8 to15 Years
NP: Immediate to 30 Days
Job Location: Bangalore
Mode of hiring: Permanent with EVRY INDIA, Bangalore

Job Description:

  1. Minimum 8-10 years of hands-on software development experience.
  2. Experience leading a team of developers.
  3. Minimum 6 years of experience with ASP.NET, C#, JavaScript Frameworks such as Angular, React, XML, JSON and REST/SOAP/WCF Services.
  4. Leverage vendor frameworks (.NET) and capabilities to meet business-defined processes.
  5. Create technical designs and perform peer code reviews.
  6. Analyze, design, develop, test and implement web applications and integrate with 3rd party services using Microsoft.NET Framework and .NET Class libraries.
  7. MS Visual Studio.Net 2008 or later Technologies.
  8. MS SQL (ADO.NET, Store Procedures, SSRS, Entity Framework)
  9. Experience in Queuing Technologies - MSMQ/RABBITMQ/AZURE Service Bus
  10. Strong experience working with the following tools/technologies: Jira, Subversion, TeamCity, Jenkins, MSBuild, NAnt, and PowerShell source code and build management systems
  11. Strong experience designing and working with n-tier architectures (UI, Business Logic Layer, and Data Access Layer) and service–oriented architectures.
  12. Strong technical background, analytical, and problem-solving skills
  13. Proven experience in delivering the full software development life cycle within Agile/Scrum software delivery methodology.

If you are interested for this position , Kindly share your below mentioned details further process .


Total Exp :

Relevant Exp:

CTC :

Ex CTC :

Official Notice period :

Negotiable Notice Period :

Highest Education:

Current Company:

Current Location:

Preferred Location:

Current Employment Status: 

Reason For Change:

Prefered Company : Evry India

Any offer's in Hand :

Offered CTC : 

Buyout Option:


Kindly Acknowledge over mail with your updated Profile 


FILLING ALL THE DETAILS IS MANDATORY, KINDLY CO-OPEROTE


Referrence are Apprecaited, if  Candidate are in same skill as per JD. 


Regards,

Shobha M Aradhya | Sr. IT Associate - Talent Acquisition

Kasmo Technologies Bangalore Center

Map | https://goo.gl/maps/5FACDAHgDA72

Phone number 8618262763

Email |Shobha@Kasmo.co

Linkedin https://www.linkedin.com/in/sadha-m-aradhya-2a35a314a/

Website http://kasmo.co/

What is CTE in SQL with example?

 A Common Table Expression, also called as CTE in short form, is a temporary named result set that you can reference within a SELECT, INSERT, UPDATE, or DELETE statement. The CTE can also be used in a View. In this article, we will see in detail about how to create and use CTEs from our SQL Server.

In this article, we will see in detail about how to create and use CTEs from our SQL Server.

Syntax and Examples for Common Table Expressions

The CTE query starts with a “With” and is followed by the Expression Name. We will be using this expression name in our select query to display the result of our CTE Query and be writing our CTE query definition.

To view the CTE result we use a Select query with the CTE expression name.

Or

Common Table Expression (CTE) Types

There are two types of CTEs: Recursive and Non-Recursive

Non-Recursive CTEs

Non-Recursive CTEs are simple where the CTE doesn’t use any recursion, or repeated processing in of a sub-routine. We will create a simple Non-Recursive CTE to display the row number from 1 to 10.

As per the CTE Syntax each CTE query will start with a “With” followed by the CTE Expression name with column list.

Here we have been using only one column as ROWNO. Next is the Query part, here we write our select query to be execute for our CTE. After creating our CTE query to run the CTE use the select statement with CTE Expression name.

Output: When we run the query, we can see the below output.

Recursive CTE

Recursive CTEs are use repeated procedural loops aka recursion. The recursive query call themselves until the query satisfied the condition. In a recursive CTE we should provide a where condition to terminate the recursion.:

We will see how to create a simple Recursive query to display the Row Number from 1 to 10 using a CTE.

Firstly we declare the Integer variable as “RowNo” and set the default value as 1 and we have created our first CTE query as an expression name, “ROWCTE”. In our CTE we’ll first display the default row number and next we’ll use a Union ALL to increment and display the row number 1 by one until the Row No reaches the incremented value to 10. To view the result, we will use a select query to display our CTE result.

Output: When we run the query, we can see the below output.

CTE Query to display Date Range:

Let’s consider as there is a scenario to display the date from start date to end date all one by one as each row with details. In order to display the recursive data, we will be using the CTE Query.

Here we will write a CTE query to display the dates range with week number and day. For this we set the start and end date in parameter. Here in this example we have used the getdate() to set the start date as Todays date, and for end date we add 16 days from today.

CTE without Union All

Here we can see we have create a simple CTE query to display the RowNo, start date and week number. When we run this we will get only one result with RowNo as “1” ,StartDate as current date and week number along with week day.

Output: When we run the query, we can see the below output.

CTE with Union All

In order to display the result from start date to end date one by one as recursive, we use a Union All to increment RowNo, to add the day one by one till the condition satisfied the date range, in order to stop the recursion we need set some condition. In this example, we repeat the recursion to display our records until the date is less than or equal to the end date.

Output: When we run the query, we can see the below output.

Multiple CTE

In some scenarios, we need to create more than one CTE query and join them to display our result. In this case, we can use the Multiple CTEs. We can create a multiple CTE query and combine them into one single query by using the comma. Multiple CTE need to be separate by “,” comma fallowed by CTE name.

We will be using above same date range example to use more than one CTE query, here we can see as we have created two CTE query as CTE1 and CTE 2 to display date range result for both CTE1 and for CTE2.

Example :

Output: When we run the query, we can see the below output.

Using CTE query for SQL Table

Now let’s see on, how to use CTE query for our SQL server table data.

Create Database: First, we create a database for creating our table

Create Table: Now we create a sample Item Table on the created Database.

Insert Sample Data: We will insert few sample records for using in our CTE Query.

CTE Example:

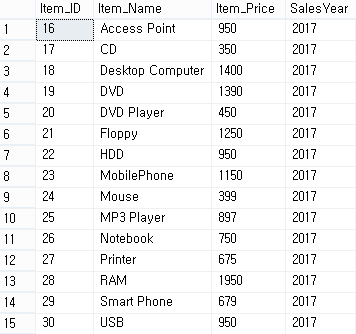
Now we will create a simple temporary result using CTE Query. Here in this CTE Query we have given the expression name as “itemCTE” and we have added the list of Columns which we use in the CTE query. In the CTE query we display all item details with the year.

Output: When we run the query, we can see the below output.

CTE using Union ALL

Let’s consider there is a below two scenarios to display the result.

  1. The first scenario is to display each Item Price of current Year.
  2. The second scenario is to increment 10% to each Item Price for next year.

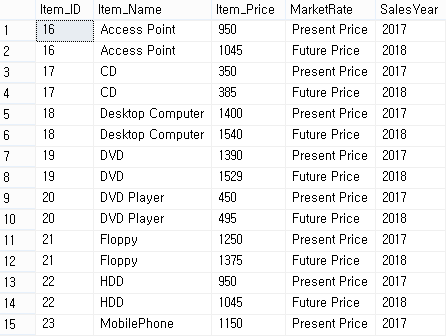
For this we use the above CTE Query. In this query, we add the UNION ALL and in UNION ALL Query we do calculation to add 10% to each item Price and show in next row with adding one year.

Output: When we run the query, we can see the below output.

Common Table Expressions (CTE) for Insert

Now we will see how to insert the CTE result to another table. For this let’s consider our above Item Table. We insert the Item details result of above CTE query to Item History table. For this first we create an Item History table.

Create Item History Table: In this history table, we add the same columns as item table along with MarketRate column as present or future Item price. Here is the query to create an ItemHistory table.

CTE Insert Example:

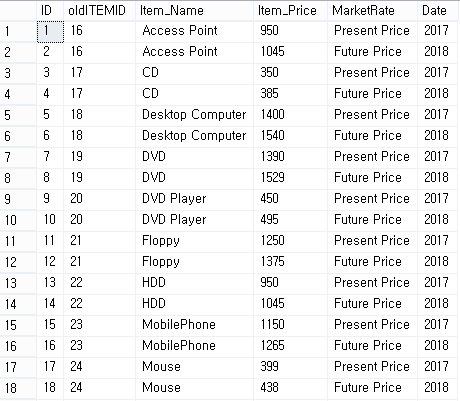
Here we use above same CTE query Insert the result in to the Item History table. From this query we insert both item details of present year Item price along with the next year Item prices added as 10% more.

Output: When we run the query, we can see the below output as 30 records has been inserted into our Item History table.

Select Query:

To view the item history result we select and display all the details.

Output: When we run the query, we can see the below output from item history table.

Create View with CTE Example:

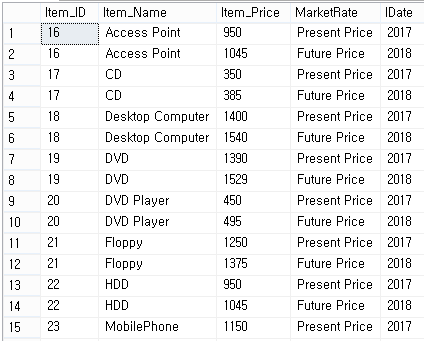
Now we see how to use the above CTE query can be used in a view. Here we create a view and we add the CTE result inside the view. When we select the view as a result, we can see the CTE output will be displayed.

Example Query:

Output: When we run the query, we can see the below output as result from the View.

How to write a clean CTE Query:

Here are some basic guidelines that need to be followed to write a good CTE Query.

  1. A CTE must be followed by a single SELECT, INSERT, UPDATE, or DELETE statement that references some or all the CTE columns.
  2. Multiple CTE query definitions can be defined in a non recursive CTE.
  3. A CTE can reference itself and previously defined CTEs in the same WITH clause
  4. We can use only one With Clause in a CTE
  5. ORDER BY, INTO, COMPUTE or COMPUTE BY, OPTION, FOR XML cannot be used in non-recursive CTE query definition
  6. SELECT DISTINCT, GROUP BY, HAVING, Scalar aggregation, TOP, LEFT, RIGHT, OUTER JOIN (INNER JOIN is allowed) subqueries cannot be used in a recursive CTE query definition.

Conclusion

CTEs can be used to create a recursive query and can be used to reference itself multiple times. CTEs can be used instead of views and finally a CTE is easy and simple for readability and code maintainability.

See more

Check out ApexSQL Plan, to view SQL execution plans for free, including comparing plans, stored procedure performance profiling, missing index details, lazy profiling, wait times, plan execution history and more


Rewrite whole Web Site System and Sub System with data migration to new system.

Can you please share me your skype id or whats up number for better communications  my skype id is - jitendra.tech  whats up - +919617741414...